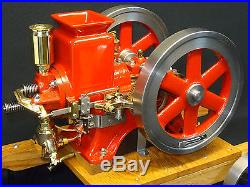
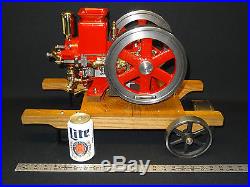
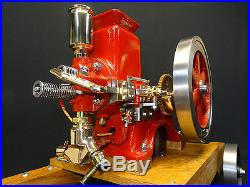
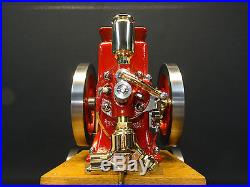
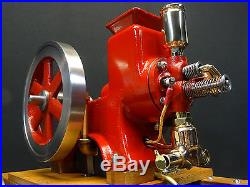
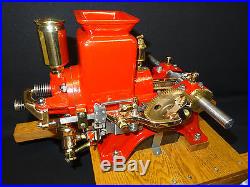
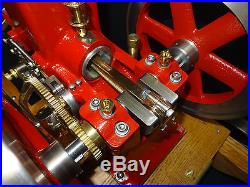
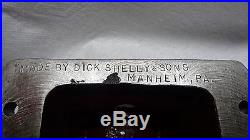
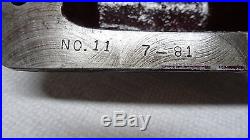
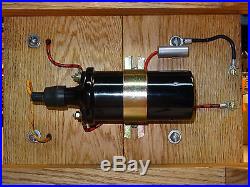
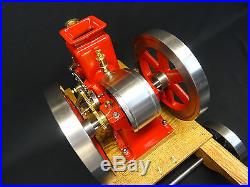
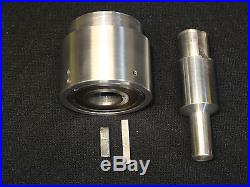
This is a pro built / machined ½ scale Olds engine that was made from Paul Breisch castings. It was machined by the well known Dick Shelly. On the bottom of the engine pads it’s stamped Made by Dick Shelly & Sons Manheim Pa. 11 7-81 So it looks like it is the 11. One they turned out and it was machined in July of 1981. I added to the look of this engine by doing all of the polishing and paint work along with machining of the brass exhaust stack and the crank shaft oil cups. I also made the one way bearing drill starter that I will be including in this sale. In the video I say that the starter is not included, but I have changed my mind and will be including it. This one is my prototype for others that I will be making. It just makes starting engines like this so much easier!!! Especially on the very hot and humid day when I decided to pull this off my shelf and get it running. What you get in this sale. You get the engine mounted on the shown cart/base. The crankshaft cover/guard that is shown in the video but is off in some of the photos to show the engine details. So please see my video so you can see the starter in use. (my drill is not included). Note; The included starter key that goes in a drill is for a ½ inch chuck and that is what I recommend using. I can turn that down to a smaller size for you on request, but you might run into slipping of the key or not enough drill torque to turn the engine over. The engine features a 1 7/8 bore x 2 stroke, 8 1/4 dia. There is a hand crank , flip out starter handle in the one flywheel. The engine itself measures approximately 15 long by 10 wide and is about 9 inches high from the base of the engine (stand not included in this measurement) to just above the top of the exhaust stack. The wooden cart/base this engine is mounted to is 22 inches long by 14 inches wide and at the axle ends and weighs in at just under 60 lbs. Many hours of machine work and assembly goes into producing a quality scale model like this. A lathe, milling machine and experienced operator were needed to finish the castings and to fabricate the additional parts required. Having to pay someone for all of the machine work and fabrication involved would cost quite a bit! I know I have about two months wort of work into this one doing the paint and polishing work along with making a few parts and the starter. I worked as a Goldsmith/Jeweler for well over 30 years and I have a vast mechanical background once building successful racing engines for a few street rods and dirt track race cars. Here is a web link that will take you to the video of this engine running. Sorry for the low quality looking video. YouTube will only let me post a HQ video from my iPhone that runs not much longer than 5 minutes. This one is 11 minutes long so I had to go with a standard quality on the video. 1/2 Scale Running Hit and Miss Model Engine. My user name there is JoeKind1958. (Not my real name). I think that the challenge in getting a scale engine like this to run and sound like the real thing is to run it slow and have it fire on just one intake stroke after the governor kicks out as I have accomplished here. In looking at many videos of scale engines on YouTube, I see that many of scale engines are running way to fast and they need to go through several intake strokes till they finally draw in enough fuel/air to fire just once. It takes patience and experience to get them to run the way I show this one running in the video. I will explain some more here in the ad. But I must first say that to avoid someone purchasing this engine and they get upset because it does not run correctly for them, that you need to have some understanding of how these engines work. All the instructions I can give you are in this ad and in the video. I make no guarantees or clams here in my ad that it will run as good for you as it does for me or even if you have the mechanical ability to start it. They are among the best looking engines when they are painted nicely, built correctly and have some polished parts on them. They make a great display piece and are a real show stopper when on display. This ½ scale OLDS features a point ignition with spark coming from a automotive coil that is mounted under the display stand. The 12v battery and the white wire running from the battery to this engine is NOT INCLUDED in this sale. The fuel tank is mounted underneath the engine. There is a fuel fill located on the one side between the flywheel and the engine. The fuel fill cap is vented so there is no need to keep it loose. There is a brass fuel tank drain plug that you will see coming out the front / bottom of the engine and it has a screw on cap. This fuel tank has a built in one way check ball fuel flow valve built into it, but I found that it did not work like it should. A properly running Hit and Miss engine freewheels in-between the times it pulls in a intake charge and fires. It is during this freewheeling time that fuel can siphon back into the fuel tank causing there to be only air, not fuel at the tip of the mixture needle. When this happens the engine needs to cycle through a few intake strokes to draw fuel back to the port where it comes out in the carburetor all because it siphoned back to the tank. That is why you see people running these at a faster speed as the engine needs to go through a few intake strokes rather than taking just one intake stroke to pull in fuel. That being said I added one of my modified one way flow valves in line just before the carburetor. This valve keeps the fuel at the adjustment needle tip and its ready to be pulled into the engine on the next intake stroke. I found it ran best at one and one half clicks out. I say clicks because you will see there are notches and a stop on the mixture knob. That is where it seemed to run the best for me. Now keep in mind that the temperature was in the mid 90′s and the humidity was very high, almost 100% when I took the video. So if you know anything about getting a engine to run like it should, the fuel type, quality, heat and humidity play a big part in how a engine runs. I used Coleman lantern fuel with a few drops of model airplane caster oil mixed in for upper cylinder lubrication. My opinion on the mixture needle. How sensitive the mixture needle is (how much you need to turn it to make a engine run rich or lean) has everything to do with how it adjusts the fuel flow into the carburetor. And this comes down to the needle seat and the mixture needle itself. A short taper on the end of the mixture needle will result in a adjustment where it does not need to be turned very much to go from no fuel coming out to a full fuel flow. A long thin taper to the end of the adjustment needle will result in a finer control of the fuel flow as it will be needed to be turned out more from the closed position to get to the full flow point. This engine has a shorter taper on the end of the mixture needle and that is why only a very small movement (turn) is needed to set the air/fuel ratio. I have no problem with this, but if the next owner wants some better control over the fuel mixture, having a longer taper machined on the mixture needle is what you would want to do. I have a lot of experience with many different types of these model engines and this is the best advice I can give you on running this one. It’s what worked for me. What works for you might be something completely different. NOTE: This is a running reproduction of a antique engine. It is a adult collectable item and is intended to be used by a experienced adult. Just like the original engine, it has no safety guards in place, though this one does come with the crank guard that is shown in possibly one of the photos and is on the engine in the video. Loose clothing, long hair or fingers could become cough in any moving part when this engine is running or even being turned over by hand. Use commonsense and keep your fingers especially small fingers! Away from all moving parts! I make no guarantees or clams as to how it will run for you or even if you would be able to get it started. Some mechanical knowledge and experience is needed to run any antique model engine like this. I have clear photos posted showing many different angels. I have a video posted showing it running. I describe in this ad, details of the starting process. You should have some knowledge of a engine like this, like how to maintain it, keep it lubricated and adjust it if necessary as I provide no instructions other than what is in my videos and written in this ad. No guarantees of any kind are included with a hand made, adult hobby item like this. What you see is what you get. The 12 volt battery and the white cable from the battery to the engine is not included. If you want a more detailed photo of something or have any questions I will be more than glad to respond in a timely manor. The engine will be wrapped up in several layers of heavy duty industrial type bubble wrap. I will then fit this into a box or surround it with cardboard before more layers of bubble wrap are added. Total weight could be around 70lbs. It is held on with 4 nuts/bolts and would require removing the hot wire to the points, take the wire off of the spark plug and the fuel line off of the carburetor. For you to mount it back on the base would be easy and would only take a short time. This is gasoline powered scale model engine that comes with no instructions or guarantees what so ever!! Do not stick your finger or other body parts in a rotating mechanical assembly!! The new owner assumes all responsibilities and liabilities to himself/herself and others with this engine. This is an adult collectible item not to be operated or played with by children. I make no clams to it being safe as it is a antique scale model reproduction produced back in the day when no safety guards, air bags, safety warning labels, ect.. Were attached to dangerous products. I make no claims that it will even run as some might not have the mechanical ability to figure it out. By purchasing this item you are stating that you have read my whole ad, you understand it and that you agree with the terms and policy’s stated in this ad. I have detailed photos posted. A link is in this ad that shows this engine running. Thank you for looking!! Should you have any questions, please ask. Thank you for looking! The item “1/2 scale running Hit and Miss engine, Breisch castings, Shelly machined, NICE” is in sale since Monday, July 25, 2016. This item is in the category “Toys & Hobbies\Models & Kits\Tools, Supplies & Engines”. The seller is “t-n-b123″ and is located in Reading, Pennsylvania. This item can be shipped to United States.
- Year: 1981
- Country/Region of Manufacture: United States
- Brand: Breisch Olds